Basic 7 Basic Technology Plan Enotes 2nd Term
Basic 7 (JSS1) Second term Enotes. Basic Technology Plan Lesson Junior Secondary School. Wood work Bench Fittings, drawing instruments.
SECOND TERM SCHEME OF WORK BASIC 7 BASIC TECHNOLOGY
| WEEKS | TOPICS | LEARNING OBJECTIVES: At the end of the lesson the students should be able to: |
| 1 | Revision of last term’s work | |
| 2 | BUILDING | Define the meaning of building, state materials for building , state common building materials |
| 3 | DRAWING | Explain drawing , state instruments and materials , state uses of drawing |
| 4 | Basic Techniques / Care of handling drawing instruments | Explain reasons for care of the drawing materials |
| 5 | BOARD PRACTICE | Explain, State settings, layout of board practice and identification |
| 6 | BOARD PRACTICE | Explain Lettering, Free handwriting |
| 7 | MID TERM BREAK | Midterm- Test |
| 8 | Freehand Sketching | Define the meaning freehand sketching , state techniques of drawing |
| 9 | Freehand sketching of workshop hand tools | Explain meaning state handwork tools, sketching sample of handwork tools |
| 10 | Wood work Bench Fittings | Explain meaning , state types , examples , state uses of and tools, state materials |
| 11 | Revision | |
| 12 | Examination |
WEEK: 2 DAY: SUBJECT:
DATE: TOPIC:
SUBTOPIC: PERIODS: DURATIONS:
LEARNING OBJECTIVES: At the end of this Topic, Pupils should be able to:
- Know the Definition of Building
- Identification of Types of Building
- Know the Material needed for Building
KEY VOCABULARY WORDS:
INSTRUCTIONAL MATERIALS:
CONTENT:
BUILDING
Definition of Building
A building is a structure that has a roof and walls and stands more or less permanently in one place.
TYPES OF BUILDING
- Mud houses: it can be mud house with thatched roof or iron roofing sheet
- Wooden houses: built with timber
- Huts: they are small and can be built from thatch or bamboo.
- Duplexes: they are modern house with room and two floors, built with cement and corrugated iron roofing sheets.
- Flats: they are set of rooms usually on the floor of a building with two or more floors. It may be one, two or more bedroom flat.
- Penthouse: it is an apartment located on the top floors of a building.
- Skyscrapers: a building with many stories
- Bungalows: a small house with single story.
Sub-Topic I:
Types of building
A building is a structure which is designed by the architects or draughtsmen and built for the purpose of providing shelter for human beings.
Building can also be identified through their construction design. The types of buildings are: bungalow, duplex, detached and semi-detached, hut, high-rise, skyscrapers etc
- Bungalows:- These are buildings that are only at the ground floor
- Duplex: – Is a compact storey building, roofed at the first floor and only designed to locate the sitting room, dining room, the kitchen and guest room with their conveniences are located at the first floor.
- Detached: A residential building standing alone
- Semi-detached or terraced building: Are series of unit buildings along a line joined together with common dividing walls
- Skyscrapers: A very tall storey buildings with many floors.
- Hut:- This a small unit and usually round in shape and covered thatch
EVALUATION
- What is a building
- Mention 3 types of building you know
Sub-Topic 2:
Identification of Buildings by Materials
Buildings are identified by the types of materials with which they are erected.
- Mud Buildings: These are erected with loamy or clayed soil which has been properly treated to plastic nature.
- Brick Building: Bricks are molded from dried mortar (a mixture of cement, sand and lime and at times clay burnt in a kiln. There two types of Brick Building:
- The Sun dried bricks
- The fire burnt bricks (Red bricks)
- Sand Crete Building: This is made from the mixture of cement and sand. The blocks are used to erect buildings
- Wood Building: These are erected with logs timber or plywood
EVALUATION
Mention ways through which you can identify buildings by the building materials
WEEKEND ASSIGNMENT
- …………………..buildings that are only at the ground floor
- ……………………. tall storey buildings with many floors.
- …………….small unit and usually round in shape and covered thatch
- ………………are erected with loamy or clayed soil which has been properly treated to plastic nature.
- ……………………… This is made from the mixture of cement and sand. The blocks are used to erect buildings
Reading Assignment: Students should read about types of building materials and uses of building. NERDC Basic Technology for Junior Secondary School I. Chapter 12 Pages 104 – 107
MATERIAL NEEDED FOR BUILDING
The following are some materials used when building
- Blocks
- Cement
- Wood
- Iron rods
- Roofing sheet
- Paint
- Tiles
EVALUATIVE ACTIVITIES
- What is Building?
- Identify three Types of Building
- List three Material needed for Building
CONTENT: I. Common building materials
II. Uses of Buildings
Sub-Topic I:
Common Building Materials
The common Building Materials are:
- Sand:- This is the most common building materials. The two types of sand used in building construction are soft sand and sharp sand.
- Gravel:- This is a constituent of concrete which is used in building construction. There are two types of gravel;
- Pebbles:- These are small stones excavated from pits or rover bails
- Granite chippings:- These are chipping of blasted granite stones generally collected in grade sizes
- Cement:- This is a finely powdered, manufactured substance consisting of gypsum plaster or Portland cement that hardens adheres after being mixed with water. It is an essential materials in building construction.
- Wood:- is a natural products that forms the trunk of trees which is used as a material for building construction. They are used to produce wooden doors and windows and are also as roof and ceiling structures.
- Loaves and grasses:- are not commonly used nowadays but were good roof covering materials in the past.
- Glass:-
- Plastic and Ceramics for sewage pipes for draining waste
TYPES OF BUILDINGS
Buildings are generally classified according to their uses. The following are different types of buildings:
- Residential buildings are houses we live in
- Commercial buildings or stalls are those buildings where buying and selling activities are done
- School buildings are buildings where teaching and learning take place
- Hospital buildings are buildings where healthcare services are rendered
- Hostel buildings are where hospitality is given. That is where strangers and visitors are taken care of.
- Office buildings are buildings where people do their office work
- Church/mosque buildings are buildings where religious activities are performed.
EVALUATION
List 5 types of Building Materials
Sub-Topic 2:
Uses of building
- Shelter
- Privacy
- Protection
- Comfort
- Security
EVALUATION
- List 5 building materials
- Name 3 uses of buildings
Reading Assignment
Students should read about Simple Blueprint Reading NERDC Basic Technology for Junior Secondary School I Chapter 13 Pages 108 – 109
Weekend Assignment
Objective:
1) ______ is one of the common building materials except (a) cement (b) wood (c) chair (d) wood
2) ____ is erected with loamy or clay soil (a) mud building (b) brick building (c) Sand Crete building (d) wood buildings
Essay
- Differentiate between a bungalow and a duplex
- List five building materials required for walling
WEEK: 3 DAY: SUBJECT:
DATE: TOPIC:
SUBTOPIC: PERIODS: DURATIONS:
LEARNING OBJECTIVES:
KEY VOCABULARY WORDS:
INSTRUCTIONAL MATERIALS:
CONTENT: DRAWING
Drawing instruments
- Technical pens
- Drawing ink
- Drawing boards
- Lettering guides
- Rulers & set squares
- Drawing accessories
- Compasses
DRAWING INSTRUMENTS AND THEIR USES
Drawing Instruments are used to prepare neat and accurate Drawings. To a greater extent, the ac-
curacy of the Drawings depend on the quality of instruments used to prepare them. The following is the list
of Drawing Instruments and other materials required.
a) Drawing Board
b) T-square or Drafter (Drafting machine)
c) Set Squares
d) Protractor
e) Drawing Instrument Box
f) Drawing Sheet
g) Drawing Pencils
h) Drawing Pins/Clips
a) Drawing Board:
- Drawing board is made from strips of well-seasoned soft wood generally 25 mm thick. It is created at the back by two battens to prevent warping. One of the shorter edges of the rectangular board is provided with perfectly straight ebony edge which is used as working edge on which the T-square is moved while making Drawings.
Battens Working edge (ebony)
Note: When Minidrafter (Drafting machine) is used to prepare Drawings, the working edge is not used.
2. Computer Aided Engineering Drawing
Drawing board size:
Drawing boards are made in various sizes. The selection of Drawing board depends on the size of drawing paper used. The sizes of Drawing board recommended by Bureau of Indian Standards (B.I.S) is given below
Standard size of Drawing boards
Designation
Size (mm)
Designation
Size (mm)
B0 1500 × 1000
B3 500 × 350
B1 1000 × 700
B4 250 × 350
B2 700 × 500
b) T-square :
3. T-squares are made from hard wood. A T-square consists of two parts namely the stock and the blade joined together at right angles to each other by means of screws and Pins as shown in figure 1A.2. The stock is made to slide along the working edge and the Blade moves on the Drawing board.
Wo r k i n g e d g e
Blade
Stock
Screws
The working edge of T-square is used to draw parallel lines, vertical lines or inclined lines at 30°, 600 to the horizontal using set squares.
Drafting machine (or Drafter):
In a Drafting machine, the uses and advantages of T-square, set square, scales, protractors are combined. One end of the Drafter is clamped at the left top end of the Drawing board by a screw provided
in the drafter.
An adjustable head with a Protractor is fitted at the other end of the Drafter. Two blades made of transparent celluloid material are fitted to the adjustable head and are perfectly perpendicular to each other.
These blades are used to draw parallel, horizontal, vertical and inclined lines. The blades always move paralle to the edges of the board. Use of Drafting machine helps in reducing the time required to prepare Drawing.
DRAWING INSTRUMENTS AND THEIR USES
3
Scale
Scale
Potractor
Angle
Drawing sheet
Drawing board
Parallel bar arm
Parallel bar arm
c) Set Squares :
Set squares are generally made from Plastic or celluloid material. They are triangular in shape with
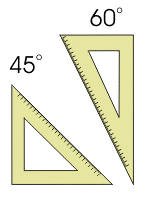
one corner, a right angle triangle. A pair of set squares (30°–60°) and 45°(45° set square are generally provided with Protractor) facilitate marking of angles as shown in figures 1A.4 and 1A.5.
They are used to draw lines at 3°, 60° and 45° to the vertical and horizontal.
Mmg . 1A.6. 45 Set Square with Protractor 0
d) Protractor: Protractors are used to mark or measure angles between 0 and 180°
. They are semicircular in shape (of diameter 100mm) and are made of Plastic or celluloid which has more life. Protractors with circular shape capable of marking and measuring 0 to 360° are also available in the market. 180
e) Drawing Instrument Box : It consists of the following
a) Large size compasses,
b) Large size divider,
c) Small size bow pen, bow divider, and
d) Lengthening bar
f) Drawing sheet:
They are available in many varieties and good quality paper with smooth surface should be selected
for Drawings which are to be preserved for longer time. Sizes of Drawing Sheets recommended by Bureau
of Indian Standards (B.I.S) is given below,
DRAWING INSTRUMENTS AND THEIR USES
5
Standard size of Drawing sheet
Designation
Size (mm)
Designation
Size (mm)
A0
1189 × 841
A3
420 × 297
A1
841 × 594
A4
297 × 210
A2
594 × 420
A5
210 × 148
g) Drawing Pencils:
The accuracy and appearance of a Drawing depends on the quality of Pencil used to make Drawing. The grade of a Pencil lead is marked on the Pencil. HB denotes medium grade. Increase in hardness is shown by value put in front of H such as 2H, 3H etc., Softer pencils are marked as 2B, 3B, 4B etc. A Pencil marked 3B is softer than 2B and Pencil marked 4B is softer than 3B and so on. Beginning of a Draw ing may be made with H or 2H. For lettering and dimensioning, H and HB Pencils are used.
h) Drawing Pins and clips:
These are used to fix the Drawing sheet on the Drawing board.
Compass: Compass is used for drawing circles and arcs of circles. The compass has two legs hinged at one end. One of the legs has a pointed needle fitted at the lower end whereas the other end has provision for inserting pencil lead. Circles up to 120mm diameters are drawn by keeping the legs of compass straight. For drawing circles more than 150 mm radius, a lengthening bar is used. It is advisable to keep the needle end about 1mm long compared to that of pencil end so that while drawing circles, when the needle end is pressed it goes inside the drawing sheet by a small distance (approximately 1mm).
Assignment
- List 5 uses of drawing instrument
- Draw set squares
Drawing As a Language
Technical drawing is a universal language used for communication among technical people. Building design is done by written language in codes and symbols. The language of lines must be under stood first before the understanding of codes and symbols.
Types and Uses of Lines in Technical Drawing:
EVALUATION
- Define the term ‘blue print’
- Give a brief explanation on the role of an architect in building industry.
- Thin continuous line is used for ————- , ——————– and ———————
- ——————– is a means of communication among the engineers and technical people
- Arrow heads are used for ————————–
Sub-Topic 3:
Reading a Building Plan
The drawings prepared for building construction are many. They include:
- The Plan: A plan is a section viewed from the top. It is a common method of depicting the internal arrangement of a building in two dimensions.
- Elevations: The front elevation shows how the building looks like when viewed from the front. It reveals the beauty of the building, as well as the back elevation which shows how the structure looks like when viewed from the back. Side views show the appearance of the building from the sides
- Sectional view: This is the projection of a cut when viewed from the plan. This shows some hidden details within the building.
EVALUATION
- Why are building drawings necessary?
- Mention different types of drawings required for a building and why they are necessary.
READING ASSIGNMENT
Students are to read about ‘Simple blue print reading-Identification of building components’ against the next lesson.
TEXT: NERDC BASIC TECHNOLOGY For Junior Secondary Schools Book 1 Chapter 13 Pages 109 – 112.
WEEKEND ASSIGNMENT
Draw the following architectural symbols:
- Door
- Window
- Wall
- Water closet
WEEK: 4 DAY: SUBJECT:
DATE: TOPIC:
SUBTOPIC: PERIODS: DURATIONS:
LEARNING OBJECTIVES: By the end of the lesson, pupils should be able to:
1. Explain the meaning of drawing.
2. Identify drawing instruments.
3. State the names and use(s) of each drawing instrument.
4. Draw some objects using some of the drawing instruments.
KEY VOCABULARY WORDS:
INSTRUCTIONAL MATERIALS:
CONTENT:
BASIC TECHNIQUE / CARE OF DRAWING MATERIALS
Drawing is a way of making marks to represent an object. You can’t have technology without making something first. And this requires accurate designs to be drawn. Common drawing instruments are set square, French curve, divider, compass, drawing board, metre rule, T-square, protractor, pencil, sharpener, and eraser.
It is important therefore that children are exposed to the practice of drawing early enough to enable them to develop the skills of technical drawing.
LEARNING MATERIALS
The teacher will teach the lesson with the aid of:
1. Drawing board
2. A complete mathematical set
3. Pen
4. T – square
5. Paper or cardboard
6. A chart showing various drawing instruments.
7. A chart showing all drawing instruments and their uses.
Drawing practice is simply technical drawing. Technical drawing is the language used by engineers and architects to interpret objects, symbols, lines, curves and conventional representations on paper.
Drawing Instruments:
Drawing instruments are tools used in technical drawing that do not get consumed while using them. They include the following:
(i). Drawing Board: This is a flat wooden board with a smooth, rigid surface. It is suitable for A3 paper.


(ii). Tee-square: This is a T-shape instrument containing a head and a stock. It is used for drawing all horizontal lines and for setting the paper on the board.


(iii). Set-square: We have the 450 and 300/600 set-squares. They are used for drawing vertical and angled lines.

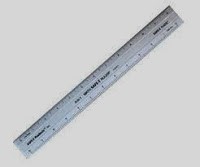
(iv). Rules: This is a 30cm wooden or plastic instrument, used for measuring lengths and for dimensioning scaled drawings.

(v). Protractor: The protractor is used for measuring angles in degrees.


(vi). French curves: This instrument is used to draw different shapes of curves.


(vii). Drawing set: This is a pack containing different drawing items like pair of compasses, divider, etc.
Drawing Materials:
Drawing materials on the other hand, are items that get consumed with use. They include the following:
(i). Drawing paper: The paper commonly used for technical drawing is the A3 paper. Other drawing papers are the A1, A2, A4, etc, depending on the work to be done.
(ii). Pencil: The2H pencil is used for construction lines, ‘H’ is for lettering and thickening of visible lines. The HB pencil is good for free-hand sketching.
(iii). Pencil sharpeners: This is a material used to sharpen all pencils to a conical point shape.
(iv).Emery cloth: Instead of re-sharpening the pencil, this material is used to restore sharpness to the pencil.
(v). Brush: The brush is used to remove dirt from the paper after erasing.
(vi). Eraser: This material is used to remove mistakes. It is made of soft quality rubber.
Care and Storage of Drawing Instruments and Materials
To care for their drawing instruments, students should do the following:
(i). Do not use any sharp objects on the edges of the drawing board.
(ii). When not in use, cover the face of the board to avoid dust.
(iii).The Tee-square should not be used as a sword or staff to play with.
(iv). Never use any sharp object on the edges of your set-squares.
(v). When you are not working with your instruments, keep them on their sheaths and packs.
(vi). Drawing paper should be kept in a flat file or jacket.
REVIEW QUESTIONS
(i). Define drawing practice.
(ii). What is the difference between drawing instrument and drawing material?
Definition of Technical drawing
Technical drawing is a universal language used for communication among technical people. A good and accurate drawing can only be made through constant practice with the aid of drawing instruments and materials.
BASIC TECHNIQUES OF HANDLING AND CARING FOR DRAWING INSTRUMENTS AND MATERIALS
We need to take care of our drawing instruments in order to prolong their service life.
Drawing Board
- Do not use pins for fastening your paper to the board, use tapes or clips.
- Do not use blade or knife to cut something on the surface of your drawing board.
- Always cover the surface with cardboard or thick paper.
- Keep the drawing board in a safe place when not in use.
Tee-Square
- Never use the tee-square as a walking stick or as a cane.
- Do not use pen-knife or blade along the edge of the tee-square
- Always hand your square when not in use.
- Always keep your tee-square clean.
Set-Square, Scale Rules, Protractor and French Curves
- Do not use any sharp object such as razor blade or knife on their edges.
- Keep them away from fire.
- Always keep them in a safe place immediately after use to prevent leakage.
Pair of Compasses or Dividers
- When not in use, keep them away in a safe container.
- Never use compasses or dividers as paper holders.
- Do not use their needle points to punch holes.
Other Instruments
All other instruments should be kept in their packets after use. A cupboard should be made available for complete storage of the drawing boards and all other instruments.
EVALUATION
- Why do we need to take care of our drawing instrument?
- How do we take care of tee-square?
- What are the uses of (a) drawing board (b) tee-square (c) set-square
READING ASSIGNMENT: Read about Drawing Instruments and Materials
TEXT: NERDC Basic Technology for Junior Secondary School 1 Chapter 5 pages 34 – 42
WEEKEND ASSIGNMENT
- _________ is used for drawing horizontal lines (a) French curves (b) compass (c) tee-square (d) divider
- French curves is made of ______ (a) wood (b) rubber (c) glass (d) plastic
- All of these are drawing instruments except (a) compass (b) drawing pencils (c) scale rule (d) knife
- It is good to use pins for fastening your paper to the board ______ Yes/No
- __________ is used for circle construction (a) compass (b) divider (c) eraser (d) scale rules
THEORY
- What is Technical Drawing
- How can we take care of Tee-Square
WEEK: 5 & 6 DAY: SUBJECT:
DATE: TOPIC:
SUBTOPIC: PERIODS: DURATIONS:
LEARNING OBJECTIVES:
KEY VOCABULARY WORDS:
INSTRUCTIONAL MATERIALS:
CONTENT: BOARD PRACTICE
Board Practice
SUB-TOPICS:
- The instrument required for a good board practice
- Setting Drawing Paper on the Board
- Sharpening pencil to conical point and knife edge
- Using the tee and set squares for drawing boarder lines and other horizontal and vertical lines
- Positioning and drawing the title block.
- Writing (freehand) legible letters and numerals
Content Development (NOTES FOR FIRST LESSON/PERIOD ONE)
Sub-Topic I:
The instruments required for good board practice
The instruments required for good board practice are:
- Drawing board and Tee-square
- Set-square (30o, 60o , 45o angles)
- Compass and Dividers
- Protractor and French curves
- Drawing pencils (HB and 2H)
- Eraser and Drawing paper
Sub-Topic II:
Setting Drawing Paper on the Board
Step 1: The drawing board is conveniently placed on the table with the paper on the board, leaving equal size all round, with the Tee-square edge to the left hand side.
Step 2: Place the tee-square on the paper and gently move or slide the tee-square to the top edge of the paper. Set the top edge of the paper parallel to the edge of the tee-square with the stock of the tee-square firmly against the edge of the drawing board on the left-hand side.
Step 3: Hold the paper with four pieces of adhesive tape or two metal cups to hold the paper in position at four corners.
Step 4: Gently slide the tee-square down without moving the paper.
Sub-Topic III:
Sharpening of Drawing Pencils to conical point and knife edge
A well sharpened pencil is very essential to technical drawing. Pencils for lettering and freehand sketching should be sharpened to a ‘conical point’ while those for geometrical or engineering drawing should be sharpened to a ‘chisel point’.
All horizontal lines are drawn with the aid of tee-square. The set-square is used sitting squarely on the tee-square to draw vertical lines.
EVALUATION
- Briefly explain how set-square can be used to draw vertical lines.
- Mention five drawing instruments.
Content Development (NOTES FOR SECOND LESSON/PERIOD TWO)
Sub-Topic IV:
Using the tee and set squares for drawing Lines
This is a practical topic. The teacher should DEMONSTRATE this as much as possible in class for the students
The various uses of setsquares are given below:
Types and Uses of Lines in Technical Drawing
| TYPES OF LINES | THEIR USES |
| Thick continuous line | For visible outlines and edges. |
| Thin continuous line | For dimension lines, projection lines and construction lines. |
| Thin long chain line | For cutting and viewing planes as centre lines and path lines for indicating movement |
| Thick continuous wavy line | For short break lines and boundary lines. |
| Thin continuous wavy line | For limits of partial views. |
| Thin ruled line with short zig-zags | For long break lines. |
| Arrow heads | Used at the end of dimension lines |
| Dotted straight line | For hidden outlines and edges |
Boarder lines are also called margins. A space of about 10-15mm is left all around the drawing paper and is demarcated with straight lines. These drawing paper are called border lines. They beautify the drawing paper and protect the drawing inside.
Sub-Topic V:
Positioning and drawing the title block
Title Block: It gives necessary information about the drawing such as name of designer, school, class, date, scale etc. The title block is usually at the bottom right-hand corner of the drawing paper.
Sub-Topic VI: Writing (freehand) legible letters and numerals
Lettering is the art of writing of letters (alphabets) and numbers (figures) in bold form or lower case form on drawing.
The most important point is that the characters of the lettering must be uniform, legible, equally spaced and well proportioned. Lettering can be done either by free hand or with an instrument. The two styles of lettering are vertical or inclined styles.
The teacher should DEMONSTRATE this as much as possible with the students.
EVALUATION:
- Mention five drawing instruments required for good board practice.
- What type of drawing instrument can be used for drawing parallel line?
- What is lettering?
READING ASSIGNMENT: Students should read about Board Practice
TEXT: NERDC Basic Technology for Junior Secondary Schools 1 Chapter 6 Pages 43-48.
WEEK-END ASSIGNMENT:
- __________ is an instrument used for drawing parallel line (a) compass (b) ruler (c) divider (d) tee-square
- Pencils for lettering and freehand sketching should be sharpened to a ______ point (a) chisel (b) conical (c) pointed (d) curved
- ________________ are also called margin (a) leaf (b) border lines (c) centre lines (d) thick line
- _____________ and ________ are two styles of lettering.
- Thin continuous line can be used _______ (a) edges (b) construction lines (c) hidden outlines (d) path lines.
THEORY
- What is title block?
- What is lettering?
Marking Guide (1) D (2) A (3) B (4) vertical and inclined (5) B
THEORY
- Title block gives necessary information such as designers name, title, date, scale etc of the drawing.
- Lettering is the art of writing of letters (alphabets) and numbers (figures) in bold form or lower case form on drawing.
WEEK: 7 MIDTERM BREAK MIDTERM TEST
WEEK: 8 DAY: SUBJECT:
DATE: TOPIC:
SUBTOPIC: PERIODS: DURATIONS:
LEARNING OBJECTIVES:
KEY VOCABULARY WORDS:
INSTRUCTIONAL MATERIALS:
CONTENT: FREEHAND SKETCHING
Freehand Sketching
SUB-TOPICS: (i) Definition or meaning
(ii) Techniques of Sketching
Content Development (NOTES FOR FIRST LESSON/PERIOD ONE)
Sub-Topic I: Definition or meaning
Freehand sketching is one of the quickest methods by which the shape of an object can be communicated to others without using any drawing instrument except a pen or a pencil. Examples of free hand sketches are:
Freehand sketching is of advantage because a good sketch reduces the amount of writing needed to describe an object.
The teacher should DEMONSTRATE general examples of freehand sketches to the students
EVALUATION
What is freehand sketching?
Name the instruments used in Freehand Sketching.
Content Development (NOTES FOR SECOND LESSON/PERIOD TWO)
Sub-Topic II: Technique of Sketching
- Sketching a Straight line: A straight line is defined as the shortest distance between two points. We can use freehand to draw a fairly straight line by the following procedures.
- Put a dash or dot far enough to the right-hand side of the paper.
- Start to draw a line from the left-hand side to join the dash or dot with your eyes fixed on the point.
- Sketching a curve: To draw a curve by freehand, it will be necessary to plot some points not too far from each other at different levels, like this ——— with the points in position attempt to draw curves by joining the dashes or dots.
- Sketching a Circle: To draw circles, the easiest way is to draw lines which are equal in diameter to the circle in different directions. Each line must be as faint and straight as possible, each crossing one another at a central point. Now, join the points by little curves from the top of each line. Try to draw other circles by means of joining two large curves having half the size as radius and full size in diameter.
- Sketching a Square Box: This can be sketched in an isometric or oblique view. Isometric views have the vertical height and the base lines included at 450 to the horizontal while the second base line is horizontal. Once it is decided which view to represent, the block is drawn by using a series of straight lines both vertical and horizontal, applying the techniques discussed earlier.
- Sketching an Irregular Edge – Figures with irregular edges are best drawn by first sketching a regular or square block which can completely contain the object. The shape is then carefully shaped by using dotted lines joined to show the desired shape with appropriate curves.
EVALUATION
- Briefly describe the technique of sketching a straight line and circle.
- What is freehand sketching?
READING ASSIGNMENT
Read about scale drawing against next lesson.
TEXT: NERDC Basic Technology for Junior Secondary Schools 1 Chapter 7 Pages 49 – 56.
WEEKEND ASSIGNMENT
- ____________ is a shortest distance between two points.
- A square box can be sketched in an _______ or __________
THEORY
- What is freehand sketching?
- State one advantage of freehand sketching.
MARKING GUIDE
- A straight line
- Isometric or oblique.
THEORY
- Freehand sketching is one of the quickest methods by which the shape of an object can be communicated to others without using any drawing instrument except a pen or a pencil.
- It reduces the amount of writing needed to describe an object.
Pencil grip
Think of the pencil as charcoal in a wooden sheath
When I draw, I use not the tip but the side of the lead in order to maximise its utility. Holding my pencil like I would charcoal also keeps it sharper longer. When covering large areas, I shade with my pencil perpendicular to the line I’m drawing to get wide, soft lines; for details, I hold my pencil parallel to my lines to get sharp, narrow marks. The only time I use the point is when I’m working on intricate details.
02. Shading techniques
Shading with unified lines versus with patches
I like to shade in two main ways: the first is with all of my lines going in the same direction, which makes my shading appear more cohesive. This pencil drawing technique also helps my details pop out from the lines I’m using for shading.
The second method I use is working in patches, which help define shape. Patches of lines go around the form, which help keep things in perspective. This technique is also great for backgrounds and adding texture.
03. Line weight
Line weight can help define solidity and volume
The next drawing technique concerns line weight. Having control over my line weight is a great way to separate objects from one another, and can help emphasise shadows. Thicker lines can fade and disappear into the shadows, which can help convey the 3D form.
I try to avoid outlining my drawings because this tends to make things look flat and deadens the 3D effect. Breaks and spaces in my lines show form in the lights and shadows.
04. Sketch language
Use light lines to explore and dark lines to commit
When I start drawing, I plan and explore using loose lines, and avoid committing too early with hard, dark lines. As I progress my lines will change; checking and rechecking my work is vital. I darken my lines and add details at the end. I don’t focus on one area for too long to prevent overdrawing.
When drawing something symmetrical, I focus on the spaces between the lines, and of course keep reevaluating as I go along.
Assignment
- What is free hand sketching
- Draw hammer with free hand sketching
WEEK: 9 DAY: SUBJECT:
DATE: TOPIC:
SUBTOPIC: PERIODS: DURATIONS:
LEARNING OBJECTIVES:
KEY VOCABULARY WORDS:
INSTRUCTIONAL MATERIALS:
CONTENT:
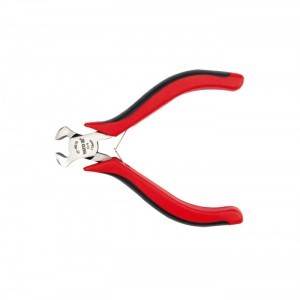
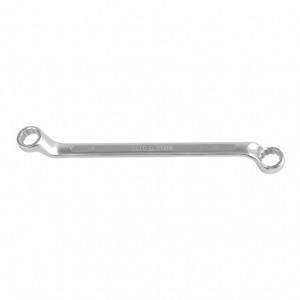
FREE HAND SKETCHING ( WORK SHOP TOOLS)




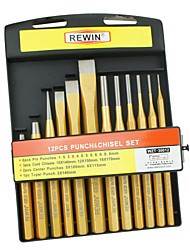
EVALUATION
- Draw mallet
- Draw hack saw with freehand sketching
WEEK: 10 DAY: SUBJECT:
DATE: TOPIC:
SUBTOPIC: PERIODS: DURATION:
LEARNING OBJECTIVES:
KEY VOCABULARY WORDS:
INSTRUCTIONAL MATERIALS:
CONTENT:
WOODWORK (BENCH FITTINGS) MEASURING, MARKOUT, BORING TOOLS
Measuring tools
Measuring is one of the activities carried out on wood or metal in the workshop to get the accurate size of the work done. Examples of measuring tools are metric rule, inside calipers, outside calipers, pairs of dividers etc. Metal or wood has to be measured into the required lengths relevant to the expected construction before cutting and construction can be done.
Metric Rule – Is the simplest measuring tool in a woodwork workshop. It is made of metal, wooden, plastic or coiled tape rule.
Calipers are measuring instruments that are used to measure the diameters of circular shapes. There are three types of calipers.
- Inside caliper is used for measuring the diameter of the inner parts of a circular object.
- Outside caliper is used to measure the diameter of a cylindrical bar.
- Odd-leg caliper is used to measure the centre lines of round bars. This caliper is also called Jenny’s Caliper.
- Divider is similar to the actual place where it is needed.
EVALUATION
- What is measuring tools?
- What are calipers?
Content Development (NOTES FOR SECOND LESSON/PERIOD TWO)
Sub Topic II: Setting and Marking out tools – are try-square, sliding bevel, meter rule, square, compass etc.
The next operation after measurements in woodwork or metalwork is marking out of the beginning and end of such measured lengths.
- Try Square – It is used to mark lines that form a right angle. It is used to test the square-ness of an edge.
- Sliding bevel – It is used for duplicating angles and for setting out bevels. The lines of such angles should not be 450
- Mitre square – The mitre square is also used to mark angles, particularly angle 450
- Compass – It is used to mark the arcs of a circle.
EVALUATION
- Explain the function of try square
- What is next operation after measurement?
Reading Assignment – Students should read about the driving tools.
TEXT: NERDC Introductory Technology for Junior Secondary School 1 Chapter 9, pages 64 – 78
WEEKEND ASSIGNMENT
- ____ is used to mark the arcs of a circle.
- ______ is used to measure the diameter of a circular shape.
- Odd-leg caliper is also called ______________
- Tools used to measure the diameter of a cylindrical bar is _________
MARKING GUIDE
- Compass
- Caliper
- Jenny’s caliper
- Outside caliper
5 marks each = 20 marks
SUB-TOPICS:
- Driving tools
- Boring tools
Content Development (NOTES FOR FIRST LESSON/PERIOD ONE)
Sub-Topic I: Driving tools
Driving tools are used to fix nails and screws into wooden and metal materials. Nails are the iron material with a flat head, smooth stem and sharp end. Screws look like nails but they have turned or twisted stem. Screws are driven into wood with screwdrivers while nails are driven into wood and metals with the use of hammers. Hammers are driving tools that have two parts – a head, which is made of iron and a wooden handle. There are five types of hammers named according to the shape of the head.
- Ball peen hammer.
- Straight peen hammer
- Cross peen hammer
- Planishing hammer
- Blocking head hammer
- Straight-peen hammer is used for riveting while other end is used for shaping sheet metals.
- Ball-peen hammer is used for general purposes.
- Blocking head hammer has polished faces. It is used for shaping sheet metal.
- Cross-peen hammer is used for drawing down and riveting.
- Planishing hammer is used by panel beaters for finishing.
Driving tools also include mallets. Mallets are soft-faced hammers, as shown in the figure below:
Screwdrivers are also driving tools and they have different shapes and sizes. They are used to drive screw in and out of wood or metals. They have a long blade with a tip that can fit into the slots (grooves) in the head of the screw with either wooden or plastic handle.
- Flat screwdriver used for screw having only one line slot on the head.
- Star screwdriver is used for screws having a star opening on the head
- Offset screwdriver is used whenever a straight screwdriver cannot be used.
- Allen screwdriver is used for driving in or removing screws which have a hexagonal or square slot in their head.
EVALUATION
- What are driving tools?
- Mention and explain two types of hammer.
- What are screwdrivers?
Content Development (NOTES FOR SECOND LESSON/PERIOD TWO)
Sub-Topic II: Boring tools
Boring is the act of making narrow holes in a material such as in wood or metal. Holes are bored in materials with tools called bits or drills. The boring tools are:
- The ratchet brace: this is the tool used to hold bits of various sizes in the chucks. Some of the bits include:
- Centre bit: for boring shallow holes in wood.
- Dowel bit : used where two components are to be held together by the dowel pin
- Countersink bit: used to enlarge the existing holes in wood.
- Double twist drill: used for boring deep hole in wood.
- Gimlet: this is the tool used for boring holes in wood before inserting small nails and screws.
- Bradawl: this tool can be used to replace gimlets, could be used as screw-driver to insert small screws, and could also be used for forming small holes before using screws or nails in the woodwork.
EVALUATION
- Mention two types of screwdrivers and their uses.
- Name and explain two types of hammer.
- Define boring tools.
- Give 5 examples of boring tools and state their uses.
READING ASSIGNMENT: Students should read about metal work holding devices.
TEXT: NERDC Basic Technology for schools Chapter 9 pages 64 – 70
WEEKEND ASSIGNMENT
- Explain the uses of star screwdriver.
- What is hammer?
Marking Guide
- Star screwdriver is used whenever a straight screwdriver cannot be used.
- Hammers are driving tools that have two parts head made of iron and wooden handle. (5 marks each = Total 10 marks)
SUB-TOPICS:
(i) Holding devices
(ii) Cutting and paring tools.
Content Development (NOTES FOR FIRST LESSON/PERIOD ONE)
Sub–Topic I: Holding devices
Woodworking holding devices are the tools used to hold work piece on the workbench. Woodworkers work on workbenches. It is on these benches that various woodwork constructions are carried out. The centre of the bench is usually lower than its two sides. This area is called a ‘well’ and its function is to accommodate the tools brought from the tool cupboard to the bench top during operations. The tools cannot fall or roll on to the floor or on anyone’s feet because this part is lower than other area of the bench.
The fittings are:
- Bench vice: also called fitter’s vice. It is used to clamp or to hold jobs when the following operations are to be carried out on the bench, filling, bending, tapping, cutting, assembling parts etc.
Other types of vice are:
Hand vice: used for holding work when performing operations such as drilling, riveting etc
Machine vice: It is fixed to the table of any machine tool.
The Care of the Vice
- Always keep the vice clean.
- The thread or the screw inside the vice should be oiled regularly.
- Do not use the vice as an anvil for hammering a job
- Always use hand force only to tighten the vice for holding the work piece.
2. Bench Stop – There are many types of bench stops. Some are made of wood while some are made of metals. It is a small strip of wood fixed on top of the bench. It is used to prevent wood from slipping off the bench top during planning.
3. Bench Hook – This is used for holding jobs during cutting and chiseling on the bench. At the same time, it protects the bench top.
4. The clamps
- G-Clamp – This is a metal clamp used for clamping small jobs together. It is called a G-Clamp because of its shape which is in the form of letter ‘G’. The clamp is ideal for holding small pieces of wood together.
- F-Clamp – This is used like the G-Clamp. The clamp is in the form of letter ‘F’.
- Sash-Clamp – it is a larger clamp used for holding and drawing woods tightly together when assembling or gluing work.
Content Development (NOTES FOR SECOND LESSON/PERIOD TWO)
Sub-Topic II: Cutting and Paring tools
Saws and Planes are used in cutting and smoothing wood in the workshop respectively. Saws are tools used for cutting wood. There are two main groups of saws: bench saw and curve cutting saws.
Curve cutting saws are:
- Coping Saw – This is used for cutting curve marked lines of wood. The blades can be adjusted to cut in any direction.
- Fret Saw – This is used to cut curves in thin wood of 8mm thick or less. It is used to cut plywood.
- Bow Saw – is used to cut along curve marked lines but the wood has to be 50mm thick.
- Compass Saw – It is used for cutting large interior curves.
- Keyhole – It is used mainly for internal curves where the bow saw cannot be used.
- Rip Saw – Is used for cutting along the grain of the wood.
- Tenon saw – Is used for cutting shoulders to tenon and recesses in board
- Dovetail saw – Is also similar to tenon saw but it is much shorter. It is used for cutting fine joints and also light sawing.
- Panel Saw – Is used for sawing thin timber across the wood.
- Cross-cut saw – Is used for cutting across the grain.
Types and Uses of planes
Bench planes are used to obtain a good, smooth surface and to get the correct size required. Bench planes are:
- Jack Plane – It is used to smoothen or remove marks from timber. It is used to dress the surface and edges.
- Trying plane – It is used to produce flat surface and perfectly straight edges.
- Smoothing plane – It is used for clearing the surfaces and edges of timbers ready for assembling.
- Block plane – It is used for planing small work that is not easily accessible.
- Spoke shave – This is an example of a curve cutting plane used to produce smooth curve surfaces and edges.
EVALUATION
- Explain the three types of clamp
- Explain the structure of a workbench
- What is the main use of a saw?
- Mention 8 curve cutting saws
READING ASSIGNMENT – Students should read about concept of energy and power
TEXT: NERDC Basic Technology for Junior Secondary School 1 Chapter 9, Pages 70-78
WEEKEND ASSIGNMENT –
- _________ is used for holding jobs during cutting and chiseling on the bench
- _________ is used to prevent wood from slipping off the bench top during planning
- _________ is made of cast iron, it is used to hold work piece securely while working
- _________ is ideal for holding small pieces of wood together
- ________ is used for holding and drawing woods tightly together when gluing work
THEORY
- List three different types of clamps you know.
- Mention three fittings in work bench.
MARKING GUIDE
- Bench hook
- Bench stop
- Vice
- G-clamp
- Sash-clamp
WEEK 11: REVISION
WEEK 12: EXAMINATION